April 04, 2011
Lisa: Happy birthday to us!
Happy eighth birthday, Two Loose Teeth! Here's hoping the upcoming year will be more filled with pithy posts than the last year has been. Thanks for being my blogging buddy, Sarah. I can't think of anyone I'd rather share my brain with.
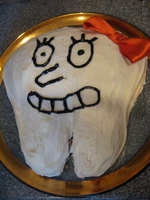
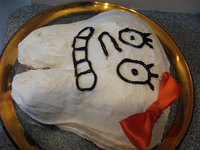
And now I will pretend that I made this tooth-shaped cake in honor of this momentous occasion, instead of for Marci's dental-hygiene-themed Crown birthday last summer. The face is modeled after the illustrations in this awesome picture book. (Edited for later reference: I baked the cake in the same cupcake-shaped pan I used for Blake's mushroom cake for his Super Smash Brothers Brawl birthday party [see it on Facebook here] and then shaved it down a bit to shape the roots and crown of the tooth.)
April 09, 2011
Sarah: The Curious Case of the Condo Complex
Can someone please tell me why there is a giant apple sitting on the water meter (Maybe? I don't know what those things are.) in my complex?
It's been there for weeks and I'm waiting for it to explode. Does someone know something about oversized water conservation apples that I don't know?
April 11, 2011
Lisa: Progress! (nursery edition)
You guys probably haven't noticed (because I can't imagine that anyone really cares), but I have been checking stuff off my before-the-baby-comes house list like crazy. Blake has been awesome, and Sarah and E have helped a ton as well. Thank goodness for tax refunds, too.
I took some (confusingly blurry) photos of Nora's spruced-up room with her new bed and rug. I haven't reassembled the crib yet to put in there, but we have measured everything out and the new furniture arrangement will fit the crib if we take out the rocker and the easel. I'm not sure if the magnitude of this discovery is clear, but our rooms are pretty tiny and I am VERY excited that it's going to work to have the girls share the upstairs bedroom.
As a reminder, the before photos are here. It's not so much a redecorating as it is a rearranging. Still, it means a lot of work and Nora is super excited about her big bed (and about her future roommate).
April 12, 2011
Lisa: I couldn't find a pun about blinds that didn't make me cringe
I have to admit, I kind of love watching Get It Sold. We're not selling our house, so I don't need to follow all the advice about neutralizing and depersonalizing, but a lot of the updates Sabrina does are very inexpensive but make a big impact on the overall look of the house. And when I say inexpensive, I mean stuff that real people could do--in a weekend--not a $20,000 budget for a glorious HGTV bathroom. It's also a great reminder that the unfinished projects you've been putting off/living with forever don't really take that much time or money to finish, and they can make a real difference in how happy you feel in your house.
Naturally, we had one such project hanging around that I decided to give the Get It Sold treatment. We have white wood-look vinyl blinds in our bedroom. I don't know if you're intimately familiar with the workings of these babies, but the top of the blinds (which is metal and holds all the mechanisms for tilting, raising, and lowering the blinds) is supposed to be covered with a decorative strip of vinyl molding. This strip is held on with two or three little plastic clips. Unfortunately, these clips are really brittle (especially after a few years), and it's almost impossible not to crack or break one as you take the molding off (or put it back on) when you're removing the blinds to wash them. At some hazy point in the past, the broken clips from all over the house got replaced with ones from the (admittedly more hidden away) bedroom, and we didn't put back those molding strips. Now, I'm sure you can just buy more clips wherever vinyl blinds are sold. The bad news is that the molding strips themselves (not sold separately and custom-cut to the size of our windows) got thrown away or lost somehow when they weren't attached to the window. DUN DUN DUN! The good news is that this was even easier than I thought it would be to fix. Photos and easy-peasy instructions below!
1. I carefully measured the length we would need the new molding strips to be.
2. Blake and I went to Home Depot, hoping for the best.
3. The regular molding area didn't have anything like what we needed, and after asking around a bit we headed back to where they sell blinds.
4. The blinds guy first told what we didn't want to hear, that those pieces are not sold separately. Then he thought for a minute out loud about how Home Depot custom-cuts them to size when people buy new blinds. He motioned us back to the area with the cutting saw.
5. Sitting right there out in the open next to the saw were two fairly long strips of vinyl molding, left from an earlier customer's sale. The blinds guy picked them up, measured them, and asked if they would work for what we needed. THEY WOULD!
6. We crossed our fingers and asked how much Home Depot would charge to let us take those off their hands. WHAT'S THAT? WE CAN HAVE THEM FOR FREE? Awesome.
7. We stopped in one more aisle for a pack of industrial-strength Velcro. I knew I wasn't going to mess with those stupid clips any more if I could help it.
8. When we got home, I cut the molding to the exact dimensions we needed with our trusty miter box and saw.
9. Then I applied one side of the Velcro pieces to the metal top bar of the blinds (a strip at each end and a piece in the middle of the longer section), and the corresponding other side to the back of the molding. This way you can get the molding off with a good tug, and the metal clips holding the blinds into the window frame aren't impeded in any way. BAM.
10. Press the new molding into place.
And that's it! No more visible metal bars with stickers listing the dimensions and previous owner's name! Pretty, finished blinds for only the cost of a pack of Velcro. We're not mentioning the paperclip situation for now. Ahem.
April 13, 2011
Lisa: Living Room Makeover
On Monday, I mentioned how excited I am about my progress on the house list, and today I want to share the room that I think is the most drastically different. Here are some very, very old before photos I found deep in the bowels of my laptop:
Now, these aren't really fair before photos. They were taken very soon after we
moved in to our house, and if you haven't actually been in my living room it's going to look like I went and bought a TON of furniture and art. There's no way we could afford to do that--in fact, we've been slowly acquiring everything over the years.
Proof:
1. I bought the Jamaica Trinnaman painting over the fireplace in 2009, and it's been mentioned here and seen on Facebook here.
2. I mentioned the big Jamaica painting over the buffet I got for graduation in 2005 (and it showed up behind the cardboard Jeffrey here).
3. My amazing family and friends chipped in on the Kathy Peterson painting (over the chair) for my birthday in 2009, as seen on Facebook here.
4. The rollerskate-themed prints have been seen on twitpic here (they used to be in the dining room, and then moved in to the living room on a different wall than where they are now). Sarah bought me the Leia Bell derby girl as a Christmas gift in 2009, and I bought myself Rollin' by Ryan Brinkerhoff early in 2010. I tried not to, but I couldn't fight it.
5. We temporarily inherited an upright piano when my brother David moved to New York for grad school in 2008.
6. Blake and I bought each other the leather armchairs for Christmas in 2007 (when I also made the throw pillows for them), and my parents gave us the coordinating leather storage ottoman that year as well.
7. When my parents moved to Spring City they didn't need their tan chenille sofa from the music room any more, so they passed it on from storage to us (possibly in 2007?). The green couch (and its ottoman) went down to the basement family room soon afterward. A lot of swearing was involved.
8. Blake bought me the side table next to the couch as a Christmas gift in 2005.
9. The family photos above the piano are new this (2010) Christmas from Busath, tweeted here (But I love the photos! Sorry about the angry tweet!).
10. I bought the yellow bird on the mantel at Craft Lake City in 2009.
BUT. The point is that you can see the original wall color and the basic dimensions of the room. The major differences from what we had a few weeks ago are the addition of the bookcases, the subtraction of our green TV cabinet (and some surface clutter), a little rearranging, and the new sage-y green paint.
Without further ado, the afters:
April 14, 2011
Lisa: It almost looks like we're real adults!
The dining room really only got an accidental makeover, when Sarah and E helped me paint it green along with the living room. Again, though, the only photos I had were really old (and never before posted here), so I thought it would be fun to post those along with some updated ones.
Before:
These photos were taken soon after we moved in, with our little apartment furniture awkwardly trying to fill the spaces of a real house. The green and white table was a hand-me-down from my dad's mom, but it was stained dark brown before I repainted it to go in the kitchen of our second apartment right before we moved. You can spy it in its original home in the background of these photos. The black locker-style IKEA cabinet was purchased in 2004, when Blake and I took Sarah and David to Balboa Island. This is the trip when Sarah got the worst sunburn I've ever seen on the back of her legs, but still trooped around IKEA with me the next day and then rode all the way back home with flat-packed furniture on the back car seat between us. The accent wall was painted that dark green when we moved in, and it's been bugging me for SEVEN YEARS.
After:
The rug that matches the one in the living room (they're two sizes of the IKEA GEDSER) was an awesome surprise Christmas gift from my parents last year. The updated chandelier is also from IKEA, and I blogged about installing it back in 2005. Blake and I bought the dining table and chairs in the summer of 2006, and he gave me the little table that holds cookbooks and Miss Petunia's tank for Christmas--possibly in 2007, since you can see evidence of its existence in these photos from 2008. The white cabinet that has doubled our kitchen-related storage capacity was a windfall from Blake's company when it was shut down last April. The painting of pomegranates in a bowl is one of the two Jamaica Trinnaman pieces I got for graduation in 2005, and you've seen it before surrounded by Christmas decorations. And...the roses are left over from a baby shower I hosted for a neighbor. I think that's it!
April 23, 2011
Lisa: 2010 ornament: Dita's Sleep Mask
As you probably know, Sarah hosts a Christmas ornament exchange every year. I know she still has some to show from this latest exchange, but take my word for it--the ornaments are just getting more and more awesome and we have so much fun coming up with something and then seeing what everybody else has made. Before I let it get too much later in the year, I wanted to show those of you who weren't in my swap group what I ended up making this time.
Preface: it probably doesn't mean anything to anyone but me, but for each swap I try to make an ornament that represents something that has been influencing me in the last year--either in subject matter or in technique. The first year we did the exchange, I had recently discovered knitting and was getting excited about the crafting potential there, so instead of glass balls I made little balls of yarn, each topped with a tiny pair of knitting needles and the beginnings of a miniature scarf. Our second year, there had been a LOT of discussion about zombie apocalypse preparedness plans, and I planned to buy Blake largely zombie-themed presents. A zombie ornament seemed like the next logical step. For 2009, I got obsessed with amigurumi and nerd culture, and crocheted tiny Cthulhus for everyone.
In 2010, I started getting more into vintage beauty, burlesque, and specifically the incredible Dita Von Teese. I drove away the few male readers we had left babbling on about it, and the rest of my free time sewing dresses from vintage patterns. Sarah and I and some of our girlfriends also had fun checking out a local burlesque troupe, the Voodoo Darlings. And don't tell her parents, but a certain like-minded friend and I actually went to see Dita perform at the Crazy Horse in Las Vegas. So fun.
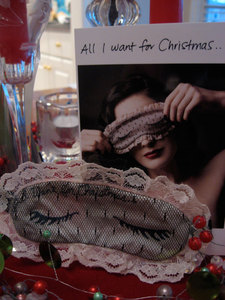
But I digress. When it came time to decide what to make for the 2010 exchange, I couldn't stop thinking about an image Dita had posted on her twitter feed, featuring her beautiful self holding up a glamorous Moschino sleep mask over her eyes. I decided (because I am possibly cracked) that miniature versions of the sleep mask would make awesome Christmas ornaments. The fact that I had a lot of the fabrics I needed already on hand made it an even more attractive option, since we were pretty broke at the end of the year.
I copied the shape of the mask and the style of the lashes and writing as best I could, swapping out "Dita for Moschino" with the more fitting phrase "All I Want for Christmas." I'm sure these details were hand-embroidered on the original, but in my slacker way I substituted carefully-trimmed printable iron-ons. I decided to line the back of the mask (which you can't see in either Dita's photo or the photo of my finished product) with a dark red satin, and I stitched in little loops of black satin ribbon on each side to accommodate either ornament hooks or a longer ribbon (for practical use by the very small-headed).
Once I had the system down and the materials in hand, I decided to make a few full-size sleep masks as well, as Christmas gifts for some of my friends. The larger version has sewn-in long ribbon tails instead of the little loops. I hope Dita would approve!


